Specials: Let's take a look at the man behind the curtain - Part 1
Have you ever read a game-related article and been assaulted by words like Уshader model 4.0,Ф Уbump mapping,Ф or any number of other cryptic, but important-sounding terms? Often enough, it's possible to gloss over this stuff and just enjoy the game, but knowing something about how games are made may actually enhance your gaming experience. Knowing how something is done makes it clearer when it's done well (or poorly). The idea here is to give you a primer on some of the jargon that gets thrown around in game discussions and reviews. It won't have you programming the next Crysis-killer, but it should help you better understand the Уvideo optionsФ screen the next time you fire up a new game.
Note: Although I know that these descriptions are full of gross oversimplifications for the sake of clarity, I've worked to avoid any out-and-out inaccuracies. If you locate any howlers, feel free to let me know.
Prerequisite: Before we start, there are just a few things we want to make sure we're all on the same page, so we'll get rolling with a few basics.
One way to think about a computer game is as a mathematical simulation of the game situation. Everything in the game, from the sound effects to the laser blasts, has to be represented with math. For the graphics, that means that the size, shape, and position of everything you see in the game world is described with a series of 3D points called
vertices. If you look at the first illustration, you'll see an object represented by a series of lines. Where the lines come together is called a vertex, which will have a certain x, y, and z value in the game's 3D space. Three vertices form a triangle, the basic shape of the graphics in just about all computer games. They're so common that you'll also hear them called
polygons or
polys. Triangles are handy for games graphics because a triangle can only exist in one plane, making them easier to draw quickly.
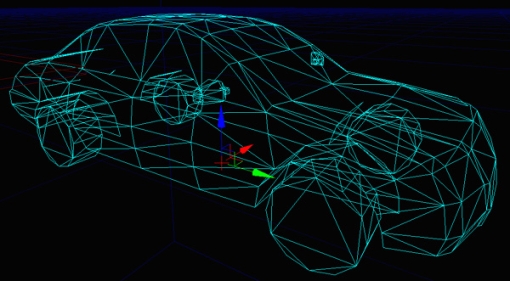
Take a whole bunch of polys and you can start building stuff like headcrabs and tanks. One such grouping of triangles is called a
static mesh, and is very common in current games, especially in the ones using the Unreal 2 and 3 engines. They're called УstaticФ because they don't have built-in animations, meaning that they're no good for characters, but great for houses, rocks, and the occasional barrel. (Meshes with animations are also built from polygons but include more complex information that defines things like joints and motions.) Static meshes help improve game performance because they allow
instancingЧmultiple instances of a barrel spread around a level use little more memory than a single barrel because the graphics card only has to УrememberФ what one barrel looks like.
The more polygons in a mesh, the more detailed the object will look in-game, but with increased costs in memory to store the mesh and in GPU time to render the object on the screen. Some games have a
mesh detail slider in the graphics options that allow you to find a balance between looks and performance. Different items in a game will be designed with different numbers of polygons based on things like their importance and how close the player will get to them. Enemy characters in an FPS don't need to be as detailed as the friendly ones the player will close to and potentially have conversations with. One of the most detailed items will always be the first-person hands and weapon, since they'll be right there in front of the player through the whole game.
Meshes alone won't get you too far, though. You'll need a
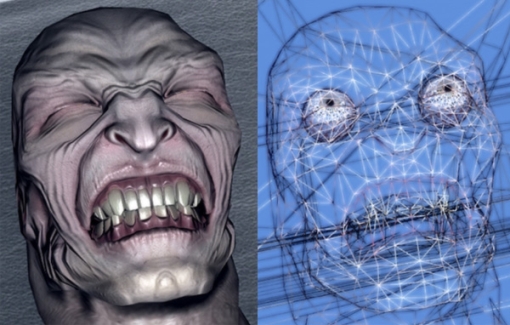
texture to cover the meshes and bring the game to life. Take a look at the second picture, from Crytek and ATI's УThe ProjectФ demo and you'll see what I mean. Look at how the texture gives shape to his features and adds lines to his skin. The
wireframe view is pretty lifeless on its own.
Texture mapping is the process of applying a texture to a mesh. With a simple model like a crate, the edges of the texture might match up nicely to the edges of the cube. In a more complex model, like with that wrinkly bald guy, an artist will go in and make sure that texture details line up with the right vertices in the model. Add to that the fact that almost everything in a 3D scene involves some variety of
linear perspective, and texture mapping can get pretty complex. Remember those converging lines you learned back in art class? In order to draw train tracks, your teacher had you drawing them coming together at a vanishing point on the horizon. The same technique has to be applied to meshes
and the textures that cover them in computer games for a scene to look anywhere near real.
Most games have some sort of setting for texture detail for that looks/performance balance. Texture detail affects performance in two ways, since larger (and generally more detailed) textures not only take up more RAM on your video card, they also take longer to draw to the screen. Game programmers know this, and they often add some sort of
level of detail optimization to their games. Textures and meshes that appear farther from the player are displayed as less detailed versions since they're smaller and less visible.
So now that we have the basics down, let's get on to a few more interesting items.
Anti-aliasing Ч One of the most commonly-discussed topics in relation to game graphics performance. As its name suggests, it is an attempt to correct
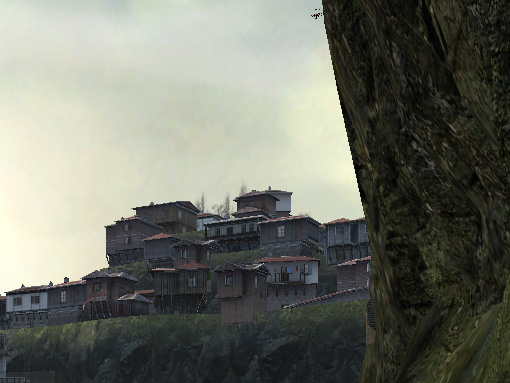
aliasing, which is an inevitable result of trying to use pixels to draw curves or diagonal lines. Since pixels are basically square (or rectangular), they can't perfectly represent a continuous curve. Compare it to trying to draw a circle using bricksЧyou'll end up with a jagged, Уstair-stepФ effect like in the illustration. Anti-aliasing fixes the problem by adding intermediate shades around the stair steps, thereby smoothing the harsh edges of the pixels. Notice how the diagonal lines in this image from Half-Life 2: Lost Coast have that jagged, stair-step effect.
Games often use
Full-screen anti-aliasing, which reduces jaggies by, in effect, rendering an image at several times the screen size and then scaling it down. When games offer the option of 2x, 4x or greater anti-aliasing, they're giving the option of rendering the screen at two or four times the needed size before scaling it down. That's why AA is generally such a big performance hit. The reason for the extra size is a technique called
supersampling, in which all those extra pixels get averaged into a new color, giving those intermediate values at the edges of the lines in the illustration.
Some games give the choice between different antialiasing algorithms like
MSAA and
CSAA. Multisample anti-aliasing (MSAA) and Coverage sampled anti-aliasing (CSAA) are both improvements over standard supersampling techniques that attempt to lower the number of samples needed per pixel. CSAA is a new feature with the Nvidia GeForce 8 series cards and is more efficient than MSAA at an equal sampling rate.
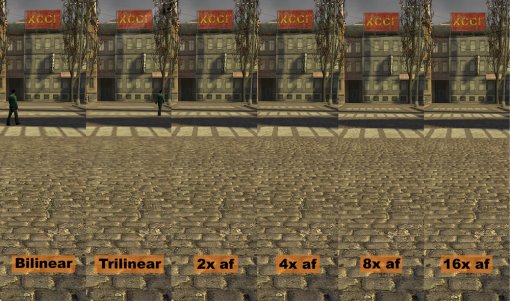
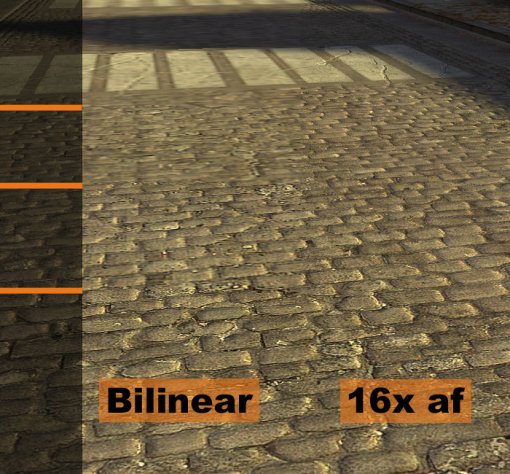
Anisotropic filtering is another common graphics setting in current games. Its primary purpose is to make textures look right when they're displayed at an angle as compared to the
camera, a good example of this being the ground in a first-person game. If you look at the example screenshots from Half-Life 2, you can clearly see the blurriness in the more distant cobblestones. And in the section with only bilinear filtering, the most distant crosswalk lines have blurred into a single, continuous streak. Notice, though, that it has no effect on the closest stonesЧthey're equally sharp in all versions.
Anisotropic filtering also helps smooth out the transitions between
mipmap detail levels. In order to improve performance, textures on more distant objects are rendered at lower levels of detail. A nearby object might get a super-sharp 512 by 512 pixel texture, while a more distant instance of the same object might only be textured with an image at 64 by 64 pixels. Interestingly enough, a similar technique (though not called mipmapping) can be applied to meshes and animations, so that faraway objects have fewer polygons and less detailed movements than close up ones. The general idea is to save the graphics hardware the task of rendering useless information to the screen. But the problem is, the transitions between detail levels is sometimes visible, as in the second picture from Half-Life 2. If you look closely where the orange lines are, you'll see a transition between levels of detail in the left part of the image, which uses only bilinear filtering. However, the right half of the image uses 16x anisotropic filtering, and shows no such transitions. This is even more apparent in-game, when you can move the camera and see the sharp line between mipmap levels move across the ground.
Well, that's enough for now. Check back soon and we'll cover a few more must-know subjects.
Be sure to check out Jason's other entries into the series,
Part 2 - shaders make it happen,
Part 3 - Depth of motion blue and the final part,
Part 4 - Doing it with particles.